Back To Home

SPECIAL EVENTS
  • Upcoming Events
  • Sewing Classes
  • Current Sale

  • CATALOGUE
  • Baby Items
  • Beading
  • Books
  • Embroidery
  • Fabrics
  • Feet
  • Heat Transfer Motifs
  • Interfacing & Fusibles
  • Lace
  • Machine Embroidery
  • Magazines
  • Needles
  • Notions
  • Patterns
  • Pleaters
  • Rajmahal Products
  • Rotary Cutters
  • Rulers
  • Scrapbooking Supplies
  • Silk Ribbon
  • SnapSetter
  • Stabilizers
  • Swarovski Crystals
         and Metals
  • Threads
  • Videos/DVD

  • NEEDLE ARTS
  • Candlewicking
  • Dolls
  • Embroidery
  • Goldwork
  • Heirloom Sewing
  • Home Decorating
  • Machine Arts
  • Needle Tatting
  • Punch Needle
  • Qulting
  • Sashiko
  • Smocking

  • SEW EQUESTRIAN
  • Fabrics
  • Patterns

  • ORDERING
  • Shipping Rates
  • Exchange Rates

  • [Home] [Meters to Yards] [How to Order] [Contact Us]


    Easy SnapSetter Instructions

    How does the SnapSetter work?

    Simply position the snap components and fabric in between the layers of the SnapSetter and hammer into place.

    Step By Step Instructions


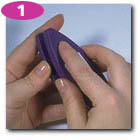
    Disassemble the three tool pieces by pushing on the post while lifting the middle and top sections.

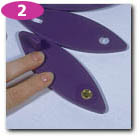
    With prongs facing up, place the snap top in the indented area in the tool base.

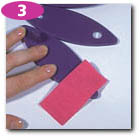
    Place your fabric over the prong points.

    Slide the middle positioning bar over the post on the base.

    With right sides up, place the snap socket in the hold in the middle positioning bar.

    Slide the top over the post onto the middle positioning bar.

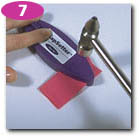
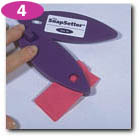
    Hammer the snap parts into place.

    Repeat steps 1-7 to attach the remaining snap components.